May 2024
A Fractured Abutment Screw IMR case Initially Attempted without Microscope Guidance or Precision Tooling Significantly Complicating a Successful Recovery
This is the third case, in a series of four, that involve progressively more difficult, immobile screw recovery. All of the cases in this series have the common issue of a previously failed recovery attempt, or multiple attempts, that were complicated by the use of various ineffective recovery tools and protocols. This series highlights how these tools and techniques created additional difficulties and complications, and how they violated the basic principles developed and followed in this practice, that encourage predictable results. The procedural and tooling inadequacies include (1) a lack of microscope visualization to properly diagnose and progressively track a case into a successful outcome, (2) not starting the recovery with conservative instrumentation, until proving the case will require a more aggressive approach to resolve, (3) then, when progression to rotary instrumentation is deemed necessary, not having the precision tools and techniques to safely resolve the case.
This third case also illustrates what can happen when a fractured abutment screw recovery is attempted without proper magnification, and the use of rotary recovery tools that were not guided with sufficient precision to avoid implant damage. The eventual outcome was good, following the successful implant mechanical rescue (IMR). The subsequent recovery, described below, became more complicated and less predictable. The identical recovery kit was used by the same dentist in this case and Case #1, with the same unacceptable outcome.
The patient presented for retrieval of a fractured abutment screw in an Astra 4.0 Tx implant in the #8 site. This implant was placed in Milwaukee, WI, along with #7, on February 17, 2015. The #7 implant is an Astra 3.5 Tx. The restorative doctor’s information was not available. It is assumed the case was restored after allowing for the appropriate osseointegration healing time. The case was restored with single tooth restorations. The exact abutment types and or manufacturer is also unknown. These implants were placed as part of a post-accident reconstruction where there was significant vertical alveolar bone loss, which necessitated additional combined height in the restorative abutments and crowns. Recently, the #8 crown displaced with no previously noticed mobility. He presented to his current general dentist, who diagnosed the fractured abutment screw in #8 and attempted to retrieve the screw fragment. Unfortunately, the effort was unsuccessful, and his new dentist referred him to a local periodontist, who then referred him to our practice without any further recovery attempts.
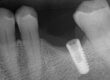
From the initial radiograph post fracture and pre recovery effort, the fracture zone in the screw fragment is revealed to be slightly above the first implant thread. In my screw retrieval algorithm, this is either a Type I case or Type II case, depending on the mobility of the fragment. I have seen many of these situations and the predominant case is a Type I mobile fragment, which often can be recovered without rotary instruments. However, if it happens to be immobile when using an endodontic explorer or modified endodontic spoon excavator, the protocol shifts to mobilizing the fragment with a concentric drilling technique. This is always done with microscope assistance using precision, custom drill guides and custom drills, which engage the guides with precision tolerance. Constant microscopic verification ensures the effort is proceeding concentrically in the fragment and not wandering eccentrically into the implant structure.


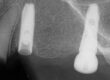
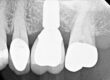
In the above images, the preop image on the left was taken prior to any recovery efforts. In this image, the position of the fragment is above the first implant thread. The center radiograph, post initial recovery efforts and before presenting to our office, shows the fragment is now even with the first implant thread and there is a space on the right side, mesial, between the screw fragment and the implant. The image on the right is our preop microscope image at 25x. This is a focus stacked image using Helicon Focus software. Using this software, about 8 photos are stacked where the focus point was progressively changed in each picture. This was done because at 25x, the depth of field is limited, and using this method can almost produce a 3d effect. It is clear there were multiple drilling efforts, and none were concentric. There were two notable ones: one at 2 o’clock and the other, a more significant one, at 8 o’clock. The other two efforts at 5 and 6 o’clock were minor and of no real significance. However, all four efforts failed to stay concentric on the screw with all eccentric enough to direct into implant structure. Unfortunately, when this eccentric drilling occurs, it almost always locks the fragment, but to varying degrees. This occurs when the implant and screw threads are cut and distorted into each other. Just a nick into one thread can immobilize a fragment and force a change in the recovery protocol.
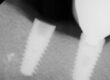
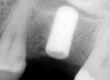
The first step in recovering this screw fragment was to establish the center of the fragment, so drilling can proceed concentrically. This involved setting up a precision custom drill guide, which was stabilized with light cured ortho resin (Orthocril LC). The drilling sequence then started with a spotting drill, with the results confirmed microscopically. Further drilling did not proceed until the spot was confirmed to be concentric. Then, a .8mm hole was bored completely through the fragment, with intermittent microscopic verification confirming the concentric position had not shifted. In the following photographs, note the difference in the position of the previous efforts and the new .8mm bore.


The bore was enlarged to 1mm in the top 1mm and a .8mm screw extractor was then engaged in an attempt to dislodge the fragment and unthread it. The extractor engaged well, but in the process of ramping up the applied torque, the last 1.8mm of the screw extractor tip fractured in the screw fragment. This was a setback and created a situation where the extractor fragment had to be drilled out to clear the original bore. At this point, it was obvious this fragment was so locked, it would require a complete drill out to clear the implant. The extractor fragment was then slowly drilled out, staying concentric as possible. The bore was then enlarged from .8mm to 1.25mm, which is the predrill diameter for a M1.6 thread. This was completed successfully and then the recovery shifted to retrieve the remaining male screw thread fragments from the female implant threads. Using a tap guide, along with a variety of custom ground taps, where the tap ends have been altered to encourage the male thread fragments to be dislodged out of the female implant threads. The thread fragments were slowly cleared.


Initially, the thought was that some of the fragile impression material of the thread detail, failed to stay Intact, producing an artifact when it was recovered from the implant. This was very apparent, especially in the far right image, which showed the piece of impression material loose and about to be lost, yet it seemed to have captured a complete thread. I had suspected there was some residual moisture, or a film of thread cutting lubricant left over from the thread cleaning process, which contributed to this impression material contamination. However, this was not totally correct, as the patient was seen on 12.04.24 after the dentist restoring the case had problems seating an impression coping, when the fixing screw would not tighten. The patient returned to our office and after passing a tap through the threads, initially with some resistance, the tap passed through the threads unobstructed. Another impression was taken to evaluate if additional debris had been dislodged and cleared.

This impression sequence is notably improved when compared to the above first impression. I suspect that there were some persistant small, residual screw thread fragments hiding in the implant threads which had created this problem. He was referred back to his restorative dentist to complete his restoration, and on 01.15.25 he updated us on the successful completion of the restoration.
A partial evaluation of the recovery kit used in the initial recovery attempt
In the previous recovery attempt, the implant damage occurred was made with tooling from a USDent screw retrieval kit, and the procedure was attempted without microscope visualization and progressive verification. Reviewing these instruments on the web, they appear to be identical to the ones in the Neobiotech SR kit. As the initial drilling outcome was so poor, I was highly suspicious this tooling setup was not adaquate to produce a consistant and concentric drilling result into this M1.6 screw in this Astra 4.0Tx implant.
First, for background information and to better understand the findings with this instrumentation, I have a list of mechanical and tolerance reasons why a guide may not produce the intended concentric bore. Here are some thoughts that come to mind, which may help evaluate tooling in the future:
1. The guide was not made concentric, so the guiding bores do not aline with the interface.
2. The tolerance fit of the drills to the guide is not adaquate, which allows for the drill to wander and drill eccentrically.
3. The tolerance fit of the guide to the implant interface is not adequate, again allowing eccentric drilling.
4. The handle system, while designed to hold the guide stable, often does just the opposite, if the tolerance fit of the guide to the implant is not secure or stable. Many implant interfaces do not offer enough stability to resist the torsional leverage a handle system can exert.
5. There was no confirmed, concentric starting point with a spotting drill, without which the drill is allowed to wander while starting the bore.
6. As these drills are small and flexible, the drills can flex, especially when starting the bore. This is a big reason for fractured drills, as this eccentric drilling side loads the drill. As the bore is deepened, the loading increases, fracturing the drill and if not, the eccentric error increases.
I was able to evaluate the kit in my lab post recovery and there were some notable findings. I could see that the conical guide supplied, only marginally seated into the Astra Aqua Tx interface. (Point 3 above) However, with the handle system attached, point 4 then joins with point 3 and together they probably create the primary reasons the multiple efforts never had a chance to achieve concentric safety, which then produced the multiple eccentric starting points noted above. The tolerence fit of the drill to the guide was reasonable, but not snug, and there was no spotting drill or confirmation of concentricity. Both of these factors added additional error. Overall, I would say a kit, with a limited number of guides, and somewhat loose production tolerences, which are expected to precisionly fit into numerous implant interfaces, regardless of size or design, is most likely to produce this type of failure. If used, extreme caution should be taken when coupled with the use of rotary instruments. Additionally, a spotting drill should be used and the position verified microscopically before proceeding to actual drilling. The protocol for the drilling plan should be planned before proceding. Depending on the screw diamenter to be recovered, the initial drill size should be sized to keep enough side wall in the fragment for stability. Otherwise, when a screw extractor is applied, the screw fragment will expand and become even harder to retrieve. Remember, dimensions are small and tolerances are tight and there is very little room for eccentric error. However, I can say with total confidence and a lot of experience, with the correct visualization, precision tools, and proper training to understand the process, recovering these fractured abutment screws is nearly totally predictable, especially if there have not been previous inappropriate attempts complicating the case.


As the predrill size for this 1.6mm screw is 1.25mm there is only .125mm on radius for eccentric error before the implant threads are invaded. However, even if the bore is totally concentric, the wall of the remaining screw will be so thin, recovery with a screw extractor will most likely expand and further lock the fragment. If the remaining threads are to be cleared as in a total drillout, the core of the screw has to be removed first concentrically at 1.25mm and then the threads can be carefully cleared using specially ground taps and tap guides. Introducing a tap, with some of the screw core still intact, will not produce the desired result. While I have sucessfully completed many total drillouts as in this case, a limited, concentric technique is a more conservative approach, with less risk to the implant. The necessity for a total drillout is mostly avoidable, especially in cases that have not yet been attempted and complicated with either eccentric drilling or ultrasonic alteration of the implant interior.
Charlie Mastrovich, DDS