May 2024
This is the fourth case, in a series of four, that involve progressively more difficult, immobile screw recovery. All of the cases in this series have the common issue of a previously failed recovery attempt, or multiple attempts, that were complicated by the use of various ineffective recovery tools and protocols. This series highlights how these tools and techniques created additional difficulties and complications, and how they violated the basic principles developed and followed in this practice, that encourage predictable results. The procedural and tooling inadequacies include (1) a lack of microscope visualization to properly diagnose and progressively track a case into a successful outcome, (2) not starting the recovery with conservative instrumentation, until proving the case will require a more aggressive approach to resolve, (3) then, when progression to rotary instrumentation is deemed necessary, not having the precision tools and techniques to safely resolve the case. The case was further complicated by the unfortunate use of an ultrasonic instrument, attempting to vibrate the screw fragment loose, without realizing the potential for significant implant damage. This damage ultimately complicated the use of taps to clear the implant threads, resulting in a Type VI case.
The subsequent recovery and reengineering of the implant, described below, became significantly more complicated and usually would have required explant of the implant. Fortunately, this alternative approach was used to save an otherwise very well placed and stable implant. The eventual outcome was good following the advanced implant mechanical rescue (IMR) procedures, combined with the altered restorative protocol.
The patient presented, on referral from a periodontist, for recovery of a fractured abutment screw from a Straumann RC 4.8 BL implant in the #14 site. The implant was placed on 04.27.23 and subsequently was restored by the patient’s general dentist on 09.13.23. The patient reported the restoration was “normal” from September 2023 through January 2024. The restoration then became loose, but he was on an extended trip out of the country, so he was not able to return for corrective treatment until May. Access to the abutment screw was gained by his general dentist, and in the process of deciding what was happening, the screw fractured. Whether it was already fractured or was fractured on retightening, is unknown. His dentist did not attempt retrieval of the screw fragment but made the referral to an oral surgeon in the area. He attempted to retrieve the screw fragment with an explorer, and piezo ultra sonic scaler. This attempt failed with the screw fragment resistant to retrieval, so the patient consulted with the original periodontist who had placed the implant, when he was in his periodontal practice for a periodontal maintenance appointment. After evaluating the case, his periodontist referred him to my office, without any additional retrieval attempts.
")
")
")
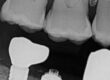
Preop clinical at 25x. Note the lead thread of the screw fragment at 9:00. The generalized swirl pattern on the fragment top was created by the ultrasonic retrieval effort.
")
")
")
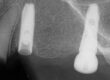
The left two images are additional preop angles to better show the damage on the left and right implant side wall. The right image shows the first spot drill placed to confirm the concentric drill position. This image showed the spot slightly off center toward 9:00 and this was corrected before proceeding.
When a screw fragment is nonmobile, it has to be mobilized if it is to be retrieved conservatively, with the hopes of preventing a total drill out. To proceed safely, a concentric drilling technique is used to avoid the implant threads, by using a precision custom drill guide and custom left hand drills. After confirming a concentric spot, a .8mm bore was placed completely through the fragment. A .8mm screw extractor was then engaged, but the fragment was very resistant to the applied torque. At that time, the decision was made to commit to a total drill out technique, before fracturing the screw extractor and creating another fragment having to be retrieved as well. At this point, the case was behaving very similarly to several past cases where a Straumann NC implant component was placed into an RC implant. I have seen this error mostly with Locator abutments (Zest Dental Solutions) but also once before where an NC custom abutment had been accidentally delivered into an RC implant. This was then confirmed to be the case, as the recovered abutment and crown were seated correctly on an NC analog but was a total misfit on the RC analog. The reason for the difficultly in routinely retrieving this abutment screw fragment was twofold. First, when the NC abutment screw is torqued down, it bottoms into the last implant thread and jams into place. This is illustrated in the two photographs below. Although this component mismatch is illustrated using a Locator abutment, the same mechanical issue occurs with a two piece abutment that has a separate abutment screw. Secondly, the use of the ultrasonic scaler smears the junction of the titanium screw and implant threads together, like a hammer weld. It actually becomes exceedingly difficult to differentiate the junction of the screw and implant threads. Therefore, the screw fragment was locked on both ends.
")
")
To proceed with the drill out, the .8mm bore was enlarged to 1.25mm, which is the predrill diameter for the M1.6 screw. Once this was completed, a series of specially ground taps, using a tap guide, were used to “pick out” the residual male screw threads from the female implant threads. This is where the prior ultrasonic effort created additional issues. This issue can better be understood by examining a short study I have posted on our website: https://mastrovichdental.com/featured-case-study/ultrasonics-complications-of-abutment-screw-retrieval-secondary-to-prior-ultrasonic-attempts/ . This simple study illustrates the extensive damage an ultrasonic instrument can do to the internal aspects of an implant in a brief time period.
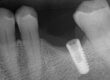
With the screw and implant threads hammered together, it was exceedingly difficult for the initial tap to find and engage the first “starting” thread fragment and “clock” into the existing implant threads to initiate cleaning or removing just screw thread pieces, without inappropriately engaging and removing an implant thread. Eventually, the tap overcame this problem and thread fragments were retrieved, but it was not without top implant thread damage, as it took several threads for the correct thread timing to be established with the tap. Following retrieval of the screw thread fragments, the implant was cleaned, thoroughly dried, and a polyvinyl impression was taken to assess the thread damage. As can be seen below, while there are remaining threads, the top threads had more damage as the thread clearing process improved as the tap found more existing implant threads.
")
To further evaluate the thread damage, the following photographs were made with the recovered abutment and crown on an open NC analog, an open RC analog and then a file image, from the Straumann website, of what a Straumann RC abutment in an open RC analog should look like.
")
")
")
")
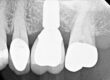
The above two images are presented to evaluate and study how an RC connection should look. The left is a sectioned RC analog with an RC Straumann abutment, and the right is a sectioned RC implant and abutment. Once you compare these images to the NC abutment in the RC analog, above right, it is easy to see how the instability in the connection mismatch created the early screw failure. Screw loosening and screw fracture is a function of joint stability, which was lost in the component mismatch.
Plan for Moving forward
With the threads compromised, the decision going forward could take one of two paths. The most common choice would be to explant the implant, graft and then replace it. However, as this implant was placed ideally, with excellent bone, the thought was entertained to consider retapping the implant to M1.8 to pick up additional threads. This is possible, as the existing M1.6 threads and a larger M1.8 threads both have the same thread pitch at .35mm. Therefore, the existing M1.6 threads could just be enlarged and not cross threaded over the existing M1.6 threads. However, to accomodate the larger diameter abutment screw, the abutment through bore was measured and it was determined that it could be tapped with a M1.8 thread to avoid excessive weakening of the abutment sidewall. This would allow the screw to thread through the abutment and then become free floating, once the threads cleared the abutment. The decision to save this implant was not made lightly, as this would create a unique implant which requires the fabrication of a unique M1.8 abutment screw and the associated components to fabricate the restoration. Carefully considering all of these and other patient centered factors, including other pending medical issues, the decision to keep the implant was chosen, by the patient. The necessary parts were then fabricated to proceed with the first step to retap and then start the implant restoration process.
09.15.24 With the plan finalized, there were two appointments necessary to complete the case. Before the first appoinment, a Straumann open pickup was modified and a 1.8mm fixing screw was made so an open tray impression could be made following the implant retapping. Additionally, a tap guide was made so the retapping of the existing threads had the best chance to remain concentric and “clocked “ with the existing M1.6 threads. The retapping was then completed, first with extreme caution to get the new M1.8 threads tracking with the existing M1.6 threading. Tapping was started with a 3 fluted plug tap and finished with a 3 fluted bottoming tap, to create as many complete threads as possible in the implant. When completed, the final threads were verified with two silicone impressions shown below.
")
")
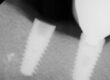
Post retapping the implant to M1.8. Notice the substantially improved threads, even though the diameter increase is onle .1mm in radius. Also note, there are additional deep threads gained over the original predrill length, as there was no effort to deepen the predrill bore. This effort was made, as the first thread was not fully recovered by enlarging the diameter.
Routine model work was completed by switching back to the M1.6 impression bolt and using a stock Straumann analog. A custom abutment was fabricated by Staumann AXS (formally Scan and Shape). Once received, the abutment through bore was tapped to M1.8 and a zirconia crown was made to be delivered screwmentable. The two impressions made of the implant, post tapping, were nickelsulfamate plated to create two custom pure nickel dies. These dies were sectioned, one completely and the other just in the end threads and used to verify the exact thread length needed when the new M1.8 abutment screw was made. The abutment screw was made from Ti6Al4V ELI alloy from Carpenter alloys (Cartech). The case was then delivered as a routine screwmentable delivery with the new abutment screw double torqued to 35Ncm.
")
")
")
")
")
")
")
")
For additional information regarding these procedures, there are additional case studies posted on our website.
Charlie Mastrovich, DDS