March 2022
This case is presented, as it is an excellent example of a common complication encountered when ultrasonic recovery attempts are attempted for recovery of fractured screw fragments. The severity of the internal implant damage is variable, but is generally greater the longer the procedure has taken and further complicated when attempted without microscope visualization.
The patient presented for fractured screw retrieval from an Implant Direct TSV Legacy 4.7 (4.5 purple interface) implant in the #31 site. This implant was placed along with #30 on 03.15.2022. Post integration, both implants were restored with two single unit crowns. The case was stable for the next 3 years, until he had undergone restoration of his mandibular arch, which was done to increase his vertical dimension of occlusion to preserve his mandibular anterior teeth. Although he reported no prior screw loosening on #30 or #31, he did mention this had been an issue in a maxillary single tooth molar restoration which recently had the abutment screw retorqued. In the process of restoring the mandibular arch, #30 and #31 were splinted to help provide more stability for the TSV connections, hoping to decrease the torsional loading individual molar sized restorations would transfer into the joints and screws. Unfortunately, three days following delivery of the splinted restoration, the implant supported crowns became loose. The abutment screws were retightened only to have this happen four more times in rapid succession. As the iatrogenic problem had not been diagnosed, almost predictably the problem escalated when both screws fractured, and the splinted restoration displaced. The restoring doctor unsuccessfully attempted screw recovery with ultrasonic instrumentation, so the patient was then referred to a second doctor. This second doctor was successful in recovering the screw from the #30 implant but could not recover #31. The patient believed ultrasonic instrumentation was used at this appointment as well. He was then seen by a third doctor, who also attempted recovery of #31 with ultrasonic instrumentation, and was also unsuccessful. He then returned to the original doctor who had done the initial individual crowns hoping for resolution in the #31 site. A short attempt was tried with a small round bur, but refrained from proceeding further and made the referral to our practice for evaluation and treatment. We were aware of the three previous recovery attempts and the multiple uses of ultrasonic instrumentation.
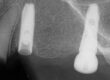
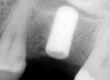
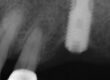
When the patient presented, #30 had a healing abutment in place and #31 had the usual tissue overgrowth. Following conservative exposure of the implant top, the implant was evaluated microscopically. The use of ultrasonic instrumentation was evident, with the flowing titanium distortion commonly seen when this modality is used. There was no visible differentiation between the screw and implant threads on the top of the screw. For comparison and to better understand the extent of destruction, a preop photograph of a fractured abutment screw case is shown below, next to the preop photograph of this case. In this case, the screw and implant threading is clearly defined, even though the screw fragment is several threads below the top implant thread. We have thoroughly documented problem cases encountered when ultrasonic instrumentation was used in an attempt to retrieve fractured screw fragments. As anticipated, the screw fragment was not mobile when evaluated with a microscope and the routine diagnostic instruments, including an endodontic explorer and a modified endodontic spoon excavator.
For further clarification of the instruments used, Click Here.
")
")
")
Additionally, it was also not clearly evident the severity of implant damage present, so to better appreciate the clinical situation, a preop. polyvinyl impression was made. This captures the lateral wall contours, as these side walls are difficult to assess even with the microscope.
")
Preop. impression photographed at 90 degree intervals to compare to the left image of a 4.5 Legacy analog as a control. Damage can be seen at the top of the hex and also on the hex side wall in the facial and mesial views. Additionally, this damage extends circumfirentialy into the first thread area.
When the situation arises that extensive retrieval efforts have already been attempted, it is often difficult to determine exactly what the clinical outcome will be. As long as there is accessability and the implant has an intact abutment interface, the question typically is not if the screw fragment can be recovered without further implant damage, but how much damage has already occurred and will the implant be restorable with OEM components. Therefore, the assessment was made that this was potentially a Type V or VI case with a Type V being restorable with OEM components and a Type VI would not be restorable with OEM components.
To fully understand our Type I through VI diagnostic algorithm to direct treatment protols, Click Here.
With a nonmobile fragment, as in this case, our treatment protocol is to use a concentric approach, away from implant threads. This involves a concentric drilling process and hopefully a recovery with a screw extractor. If not possible, then a complete drillout, with thread cleaning, is necessary. This process must be tracked thoughout, with microscope visualization, to be certain the bore is concentric and not eccentric into implant threads. This was started with a concentric spot, as there was significant alteration of the screw top, which would otherwise allow the drill to wander before starting the bore. Once the drilled spot was confirmed to be concentric, a custom drill guide was stabilized with Orthoacryl resin, and a 1.1mm custom left hand drill was used to initially clear any ledges away from the spot. Next, a .8mm left hand drill was used to the depth of about 3mm, while stopping intermittantly to verify the bore was staying concentric. Once this bore was complete, a .8mm screw extractor was used to lock into the fragment and the fragment was recovered. With the threads clear, a 1-72 bottoming tap was passed through the threads to ensure there were no residual thread burs secondary from the prior recovery attempts. A postop impression was made for a more indepth evaluation of the implant damage.
")
")
")
")
")
Postop impression photographed at 90 degree intervals to compare to the left image of a 4.5 Legacy analog as a control. The abutment screw was recovered without any additional implant damage. Ultrasonic thread damage can be seen circumfirentialy when compared to the control impression.
")
")
")
")
This case was sucessfully completed without further implant damage. There was implant thread damage in the top lead implant thread secondary to the prior ultrasonic use. It was very fortunate the screw fragment released, despite this distortion, without difficulty or requiring additional drill out procedures. This distortion can be so significant that a plug tap cannot engage and get “clocked” into the undamaged threads, which prevents cleaning of the existing threads. The initial damage already noted in the preop impression was primarily in the hex indexing feature and will not interfere with that function. However, in this abutment-to-implant joint, the abutment hex-tolerance-fit into the implant does provide for most of the joint stability. I suspect this stability was not significantly degraded, but it is a possibility to some extent.
Following placement of the healing abutment, the patient was referred back to the referring doctor for continuation of his restorative treatment.
For additional information regarding these procedures, there are additional case studies posted on our website.
Charlie Mastrovich, DDS